I’ve been building RoomKit, an open-source Python framework for multi-channel conversations. After writing about the architecture and running voice AI fully local, I wanted to push things further: what does a real, usable voice assistant look like when built on top of RoomKit?
So I built one. RoomKit UI is a desktop voice assistant for macOS, Linux, and Windows. You press a button, you talk, the AI responds in real time. It supports Google Gemini and OpenAI’s realtime APIs, connects to external tools via MCP, and ships as a standalone app you can download and run.
This post is a walkthrough of what it does, how it’s built, and what made RoomKit the right foundation for it.
The idea
Most voice AI demos live in a browser or a terminal. That’s fine for showing off a model, but it’s not how people actually want to use a voice assistant. I wanted something that sits on my desktop, always ready, that I can talk to naturally, and that can actually do things through tool integrations.
The key requirements were simple:
- Real-time, full-duplex voice conversation with interruption support
- Switch between AI providers without changing anything else
- Connect external tools (filesystem, APIs, databases) via MCP
- System-wide dictation: press a hotkey, speak, and the transcribed text gets pasted into whatever app has focus
- Run on all three major platforms from a single codebase
Two providers, one conversation
One of the things I’m most proud of in this app is that switching between Google Gemini and OpenAI Realtime is a settings toggle. No code changes, no restart, no different conversation flow. You pick your provider, enter your API key, and go.
This works because RoomKit’s RealtimeVoiceChannel abstracts the speech-to-speech layer. Both Gemini Live and OpenAI Realtime follow the same pattern: you open a WebSocket, stream audio in, and get audio back. The differences in protocol, authentication, and message format are handled by RoomKit’s provider implementations. The UI just sees “start session” and “audio frames in/out.”
In practice, this means you can compare providers side by side. Gemini tends to have lower latency for conversational back-and-forth. OpenAI Realtime has richer voice expressiveness. Having both available in the same app, toggled from a dropdown, makes evaluating these tradeoffs trivial.
MCP: giving the assistant hands
A voice assistant that can only chat is a toy. The moment it can do things — search your files, query a database, create a calendar event, call an API — it becomes a tool.
RoomKit UI supports MCP (Model Context Protocol) natively. From the settings panel, you can add MCP servers using any of the three transport types: stdio (local processes), SSE (server-sent events), or HTTP. Each server exposes a set of tools that the AI can invoke during the conversation.
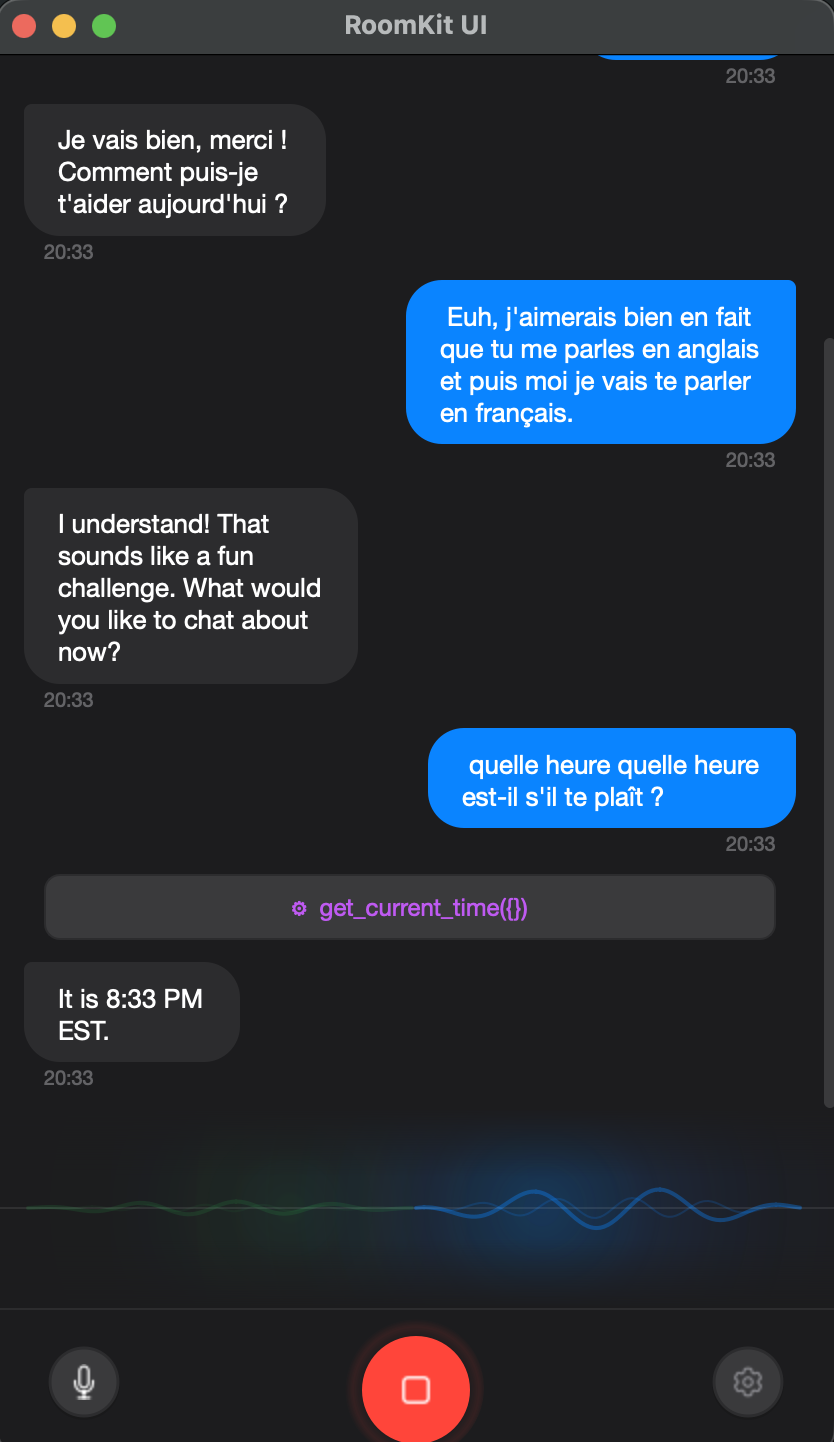
Here’s what this looks like in practice. Say you have an MCP server that exposes a search_files tool. You tell the assistant: “Find the PDF I downloaded last week about quarterly results.” The AI calls the tool, gets the results, and reads them back to you — all in the flow of a natural voice conversation.
The MCP integration sits at the RoomKit engine level. When the realtime voice provider receives a tool call from the model, RoomKit routes it to the appropriate MCP server, waits for the response, and feeds it back into the conversation. The UI shows tool calls as they happen in the chat transcript, so you can see exactly what the assistant is doing.
This is where RoomKit’s architecture shines. Because everything flows through rooms and channels, adding MCP tools doesn’t require any special plumbing. It’s just another participant in the conversation: the AI asks, the tool answers, the response gets broadcast back.
The desktop experience
Building a desktop app in Python in 2026 is surprisingly viable. PySide6 (Qt for Python) gives you native-looking widgets, proper system tray integration, global hotkeys, and audio device management. Combined with qasync to bridge Qt’s event loop with Python’s asyncio, the whole thing runs on a single thread without blocking.
A few details that make it feel like a real app rather than a demo:
Animated VU meter. The main window shows an ambient glow visualization that responds to both microphone and speaker audio levels. It’s not just cosmetic: it gives you immediate feedback that the system is listening and that audio is flowing correctly.
Chat transcript. Every conversation is displayed as iMessage-style bubbles with markdown rendering. The AI’s responses stream in word by word as the transcription arrives. Tool calls appear inline, so you can follow the assistant’s reasoning.
System-wide dictation. Press a global hotkey (configurable), speak, and the transcribed text gets pasted into whatever application has focus. This uses OpenAI’s STT API and supports 14+ languages with auto-detection. On macOS it hooks into NSEvent; on Linux and Windows it uses pynput. It’s the feature I personally use most — faster than typing for quick messages, notes, and search queries.
Echo cancellation. For hands-free use without headphones, RoomKit UI includes WebRTC AEC (via aec-audio-processing) and Speex AEC as a fallback. Combined with an optional RNNoise denoiser, you can have a conversation with the AI through your laptop speakers without feedback loops.
Project structure
The codebase is intentionally small — around 15 files:
src/room_ui/
├── app.py              # QApplication + qasync event loop
├── engine.py           # Async engine bridging RoomKit ↔ Qt signals
├── mcp_manager.py      # MCP client manager (stdio, SSE, HTTP)
├── settings.py         # QSettings persistence
├── stt_engine.py       # STT dictation engine + text pasting
├── hotkey.py           # Global hotkey (NSEvent / pynput)
├── tray.py             # System tray icon
├── theme.py            # Dark & Light stylesheets
├── icons.py            # Heroicons SVG rendering
└── widgets/            # UI components
The engine.py file is the bridge between RoomKit’s async world and Qt’s signal/slot system. It creates a RoomKit instance, registers the realtime voice channel, manages MCP servers, and emits Qt signals when transcriptions arrive, tool calls happen, or the session state changes. The widgets subscribe to these signals and update accordingly.
This separation means the UI layer knows nothing about voice protocols, WebSocket connections, or AI providers. It just reacts to signals: “new transcription,” “tool call started,” “session ended.”
Getting started
You can download pre-built binaries from the releases page, or run from source:
git clone https://github.com/roomkit-live/roomkit-ui.git
cd roomkit-ui
uv sync
uv run python -m room_ui
Open settings, pick your provider, enter an API key, and press the green call button. That’s it.
To add MCP tools, go to the MCP tab in settings and configure your servers. Any tools they expose will be available to the AI in your next conversation.
What this means for RoomKit
RoomKit UI is both a useful app and a proof of what you can build on top of RoomKit’s primitives. The same framework that handles SMS routing and email delivery also powers real-time speech-to-speech AI with tool calling — because at the end of the day, it’s all just messages flowing through rooms.
If you’re building voice AI applications in Python, I think there’s something valuable in having a framework that doesn’t lock you into one provider, one transport, or one modality. RoomKit UI demonstrates that you can go from pip install roomkit to a production-quality desktop voice assistant without any middleware, cloud services, or vendor SDKs in between.
The code is MIT-licensed and open source. I’d love to hear what you build with it.